How does it work?
Uploading and publishing MLCs
Anyone who is registered can upload micro-learning content — MLC — to the website.
For the MLCs to be browseable, searchable and filterable, they need to be accompanied by certain information that you add via the upload form. Each MLC will have their own page which will be populated by the information you provide on the upload form.
You can create and save MLCs for private use, or you can publish them to be available for anyone.
The “Create Micro-Learning Content” form
Title (required)
This will be the main heading of the MLC’s page. Make sure the title is descriptive and succinct.
Language
The language of the page you create for the MLC. The page of the MLC will be shown in the language version of the website you select here.
Typically, the language in which users use the website is the same as the language of the MLC they upload, and typically, they want to provide information about the MLC in the same language that the MLC was created in. Therefore, the default in this dropdown is the language in which the website is being viewed. (Also, by default, the language in which the website is displayed is the language of the browser. Users can change this in the language selector in the main menu.)
Description (required)
Provide a short description about your microlearning content: what is its topic, the important concepts it is built around, the experiences on using it, suggestions on how to use it, etc.
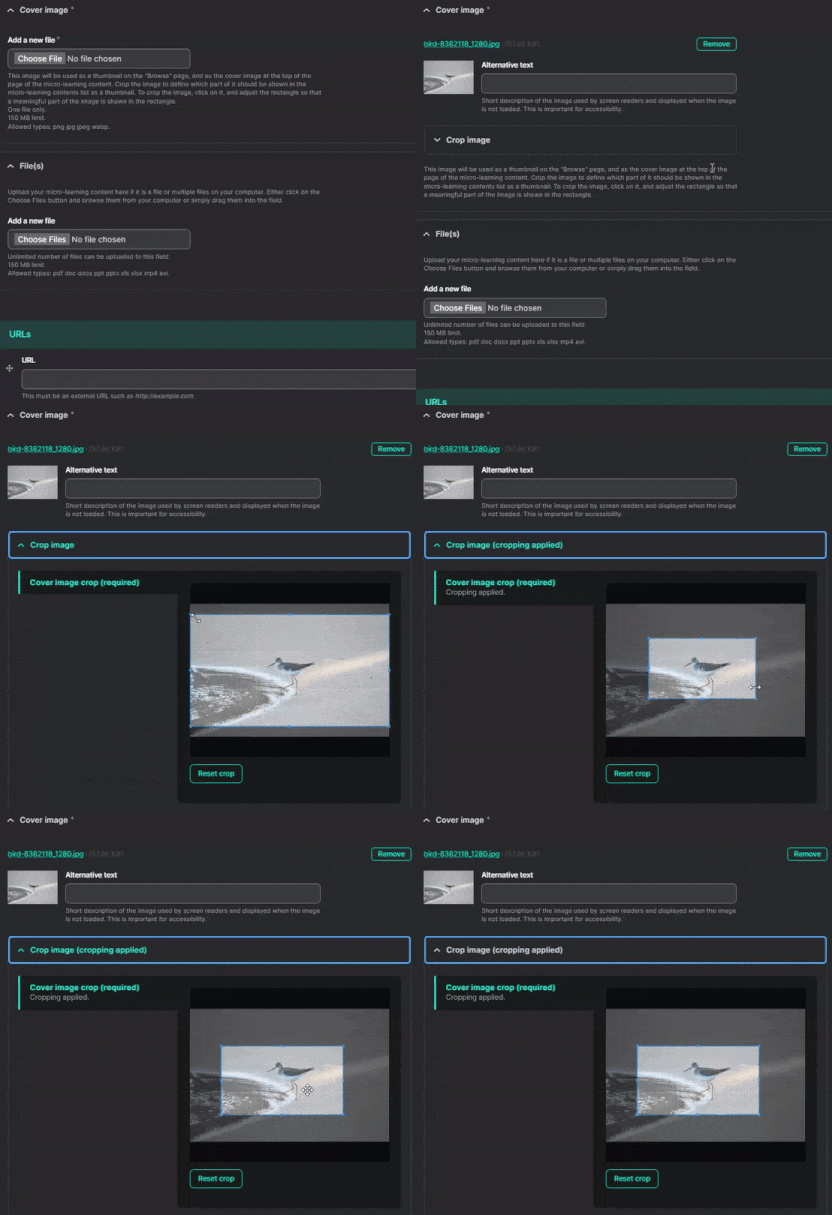
Cover image (required)
This image will be used as a thumbnail on the "Browse" page, and as the cover image at the top of the page of the micro-learning content.
Allowed types: PNG, JPG, JPEG, WEBP.
To add a cover image, either simply drag the file and drop it anywhere in the Add a new file field, or click on the Choose File button, and browse it from your computer.
Cropping the cover image
Next, crop the image to define which part of it should be shown in the micro-learning contents list as a thumbnail, and as a cover image on the MLC’s page. Click on the Crop image dropdown, and adjust the rectangle’s size and position so that a meaningful part of the image is shown in it.

File(s)
If the MLC is a file or multiple files on your computer, upload here. Either simply drag the file(s) and drop it/them anywhere in the Add a new file field, or click on the Choose Files button, and browse the file(s) from your computer.
The size limit for files is 150 MB.
A tip for uploading video files
If your MLC is a video file, it's best to upload it to YouTube, and paste the YouTube link into the URLs field instead of uploading the video file in the File(s) field.
- Go to YouTube Studio (you can log in with your GMail address).
- In the top-right corner, click CREATE and then Upload videos.
- Select the file you’d like to upload.
URLs
If the MLC can be found online, paste its link in the URL field. You can add multiple links – to add another one, click on the Add another item button.
Author(s)/Creators
Enter the name(s) of the person(s) who created the content.
Organisation/institute (required)
Enter the name of the school, organisation of the author(s)/creator(s) of the MLC.
Contributor(s)
Enter the names of any further contributors who have been involved in the creation of the MLC (e.g. as reviewers, graphic designers, etc.).
The language of your micro-learning content (required)
Select the language of the MLC that can be found on the URL or in the files you provided.
Is your micro-learning content interactive? (required)
If the users can interact with your MLC, select yes. An interactive MLC is, for example, a quiz.
The type of the micro-learning content (required)
Select the type of your MLC.
Application(s) you used to create the micro-learning content (required)
List all the applications you used during the creation of the micro-learning content. If you have used more than one app, it is helpful if you also describe which one you used for what purpose.
Accessibility features of the micro-learning content
Highlight any accessibility features, such as closed captions or alt text for images.
Target audience (required)
Define whom your MLC is for by selecting one or more target audiences from the list.
Sector(s) (required)
Define which sector(s) the topic of your MLC is related to.
Learning objective(s) (required)
Define the pedagogical objective(s) of your MLC.
School subject (or topic) (required)
Enter the school subject(s) your MLC is related to. If it doesn’t relate to any specific school subject, define its broader topic.
Saving and publishing MLCs
When you are finished filling in or editing the form of an MLC, you should save your work.
Clicking on the Save as draft button at the top of the page will put the MLC in your drafts, only you will have access to it. (You can find your drafts in your profile.) The page of an MLC with draft status has a pink background.
If you want one of your MLCs to be public, you can submit it for admin review by clicking on the Publish button. Once the admins approve it, it will be published, and you will receive an e-mail notification.